

 Share This Page
| Home | | Raspberry Pi | | | | Share This Page |
Use a Raspberry Pi computer to remotely control electrical devices
Copyright © 2016, Paul Lutus — Message Page
Current Version: 1.1 (03.19.2016)
(double-click any word to see its definition)
In this article I describe a recent project of mine that connects a virtual remote control, in the form of a Web page (Figure 1), to the Raspberry Pi GPIO control outputs. In this project the Pi runs a lightweight, dedicated Web server that hosts the remote control page. The user presses virtual buttons, and the Pi responds by activating relays to turn devices on and off.
In principle and with appropriate attention to security issues, this control can remotely control devices from any location, although it's most useful on a local area network (LAN).
As this project evolved I added the ability to control my Insteon-based house control system, so in its present form, with an extension module the remote simultaneously activates Raspberry Pi GPIO circuits as well as the older-technology Insteon controls.
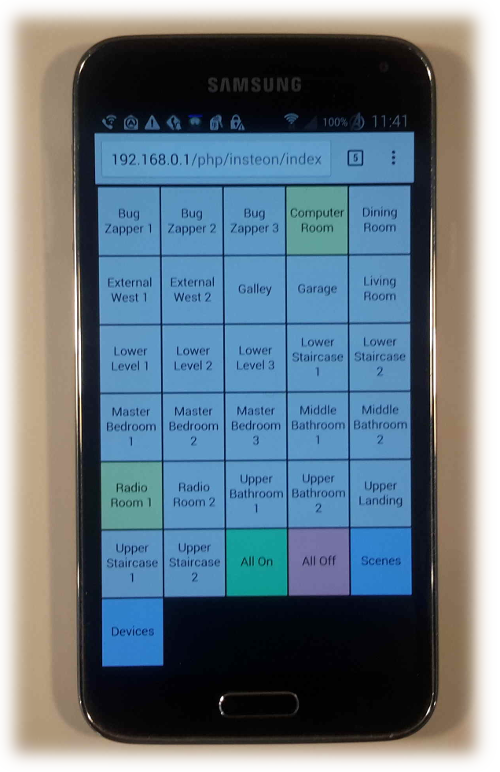
The remote supports any number of devices that access the control Web page, and all devices accessing the Web page remain synchronized — meaning they all accept control inputs, and all show the system's current state (see Figure 1, which shows the computer room channel as activated).
All the details — the Python code for the remote-control Web server, the GPIO and Insteon modules, and the schematic diagrams for the relay driver — are provided and described below.
This article is organized top-down. I first show the broad outline, then provide the details for each category, i.e. code and hardware.
Let's start with a block diagram of the entire system:
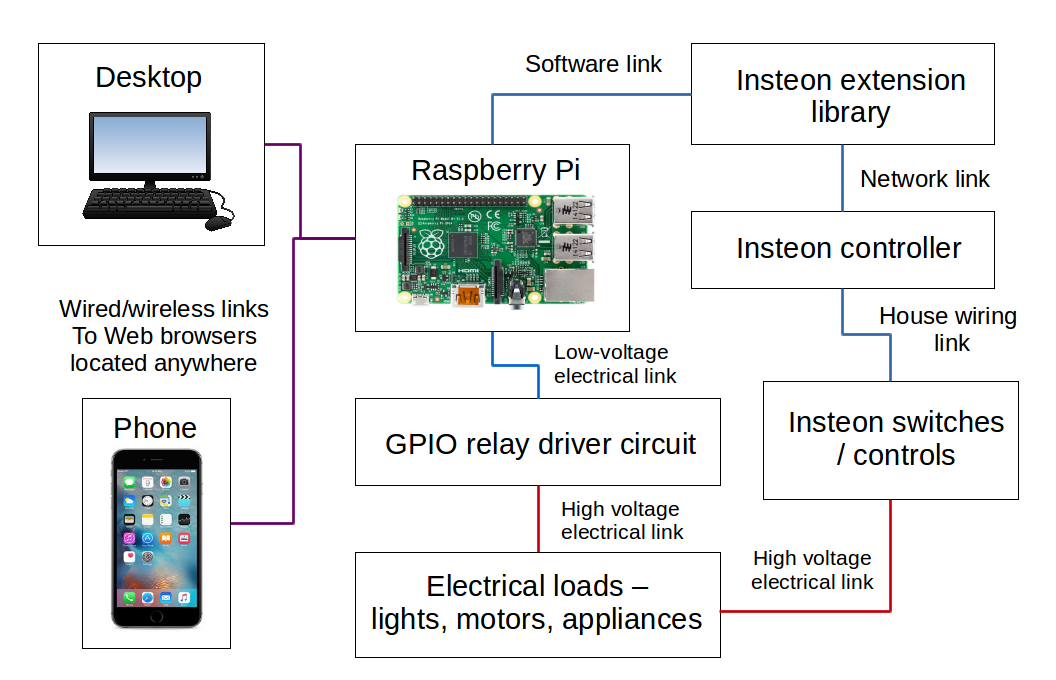
Figure 2: System block diagram
In this scheme, the Raspberry Pi hosts a simple Web server that serves the remote control Web page to any devices that log on. It's important to say that any number of devices can log onto the remote server, and all the displays remain synchronized, meaning when a device is activated by any one of them, that device is shown as activated on all the remote displays, even though the content delivery scheme is a simple HTTP transaction, nothing exotic (I'll explain below how this works).
Originally I created this project as a demonstration to show how to use the Pi's GPIO outputs to control multiple electrical devices (up to 25 in a Pi 2 or 3). Then I remembered I had been meaning to overhaul an earlier project that controls household devices using Insteon technology. So after moving the project to a practical level for the original GPIO/relay driver plan, I added a software module that simultaneously controls Insteon devices. That means the user can configure this project to control GPIO relay drivers, Insteon controls, or both.
The advantage of the Raspberry Pi in a project like this is that it's small and cheap enough to be dedicated to the remote control task, perhaps put out of the way on a shelf, and it will reliably accomplish its objective without tying up a larger computer that has more important work and that might need to be powered down periodically.
Next, I'll show details of the software and hardware required for the project.
Simple HTTP server
First, let's address the simplest issues. As it happens, there are few things easier than creating a special-purpose Web server using Python. For example, in a directory containing one or more Web pages, I can issue this from the command line (all Python examples assume Python 3):
$ python3 -m http.server 8080Then, having started the server, I can launch a browser and see the results:
$ my-favorite-browser http://localhost:8080Assuming there's a Web page named "index.html" in the directory running the server, its contents will appear in the browser. Here's an example of a minimal Web page that meets this requirement:
(Click here for a downloadable plain-text source.) What could be easier? Just create a file named "index.html" containing the above content, put it in any convenient directory, and run the Python HTTP server as shown above.
HTTP CGI server
That was easy. But let's say I'd like to serve dynamic content from a running Python program rather than a static Web page. How shall I do that? Here's an example of a suitable minimal Python script, that is to dynamic content what the above minimal Web page is to static content:
(Click here for a downloadable plain-text source.) In this simple command-line example, to serve dynamic content, to move beyond static Web pages, there are some special requirements:
First, the Python server needs one additional argument:
$ python3 -m http.server --cgi 8080(Note the added --cgi argument.)
Second, the example script must be:
- Made executable (
$ chmod +x script-name.py)- Placed in a subdirectory named "cgi-bin" (a subdirectory of the directory where the Python server is launched).
Third, the browser must specify the URL this way:
$ my-favorite-browser http://localhost:8080/cgi-bin/script-name.pyWith this setup, the Python server accepts a script name and executes it as a program, then displays the results. This means any imaginable dynamic content can be generated by a program (which doesn't necessarily have to be written in Python) and it will be executed and displayed from what's properly called an HTTP CGI (Common Gateway Interface) server.
CGI Server as Script
It's time to create a more formal version of the CGI server, embodied in a script and easier to use. Here's a Python listing for a simple server with some enhancements over the command-line version (again, all Python examples assume Python 3):
Figure 3: Simple CGI server Python listing(Click here for a downloadable plain-text source.) The above script is one of the building blocks for the remote control method this article describes. In normal practice it's automatically started in the directory containing the primary remote control script (shown below) and any needed modules for extra features. It serves those resources on a port chosen by the user, in this example port 8080.
On the issue of server port, remember that, for a process running under user authority, only ports above 1024 are available, and running a server like this under root authority is a security risk and a bad idea. So if port 8080 is already in use or you want a specific port other than the default, just enter your choice of port in the above script.
The above simple script does away with the need for a "cgi-bin" subdirectory, and it also suppresses the printing of log entries. If you're having problems with the server, it might be wise to temporarily comment out the lines that suppress log entries.
Before we move on, I should add that, if you already have an HTTP CGI server running on your Pi, this project's scripts will work with it, and in such a case there would be no reason to run the server described above. In this case all you need to do is put this project's scripts in a directory accessible to the existing server.
Simple GPIO Output Circuit
This section introduces the simplest version of the output circuit. In this testing phase, the circuit only needs to show that signals are being routed correctly — we'll add relay drivers and house-current loads later. Normally this circuit is built using a breadboard, and there are many kinds of breadboard kits available for the Pi. Here's the schematic diagram for this initial phase of the circuit, which just drives some indicator LEDs:

Figure 4: Initial schematic diagram for GPIO control
(Click image for fullsize PDF)Here's a graphic showing a breadboard setup for the schematic above:

Figure 5: Breadboard layout for GPIO output display (click image for full-size)
Here's a closeup of the wiring between the GPIO pins and the LEDs:
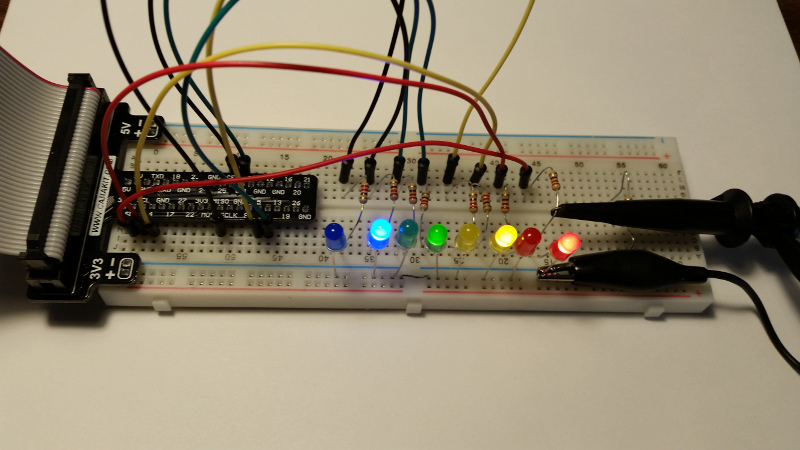
Figure 6: Breadboard layout closeup
By the way, this schematic and breadboard layout are borrowed from one of my other Raspberry Pi projects with no changes. It was perfect for this application.
GPIO Remote Control Module
It's time to introduce one of the more complex of this project's Python modules. This module serves a CGI Web page by way of the server described above, accepts user virtual button-presses, and activates Raspberry Pi GPIO outputs in response. Here's the listing:
Figure 7: Python listing of the GPIO CGI module / Web page generator
(Click here for a downloadable plain-text source.)First Test of Remote
Here are step-by-step directions for the first test of the remote control:
Digression: SSH Passwordless logins.
In the coming steps there's going to be a lot of communication between your primary computer (desktop/laptop) and your Pi, using the Secure Shell (SSH) protocol. Unless you like typing your password over and over again, let's set up passwordless logins between your primary computer and your Pi. Here's how:
- Make sure SSH has been installed on both your desktop/laptop and the Pi — on both machines, as root, type:
# apt-get install openssh-server- Create an SSH key if you haven't already. At your laptop/desktop machine, logged in as an ordinary user, (not as root) type:
$ ssh-keygen -N ''- If the ssh-keygen program tells you there is already a key file and asks permission to overwrite it, reply in the negative — don't overwrite an existing key. Just go on to the next step.
- Now to set up passwordless login. From your laptop/desktop machine as an ordinary user, type:
$ ssh-copy-id (Raspberry Pi network name)- As to the Pi's network name, if you haven't changed anything significant since acquiring it, its network name should be "raspberrypi.local".
If you've done everything correctly up to now, after you type the "ssh-copy-id" command, you will be asked to type in your password to allow the identity copy, but that should be the last time you will need to enter a password.
Create a subdirectory on the Raspberry Pi, under your user's home directory. Give it a suitable name. I've been using "rpic" but any name will do.
Download the server module shown above in Figure 3 (link), name it "cgi-http-server.py" if it doesn't already have that name, make it executable ($ chmod +x (name).py), and copy it into the directory you just created.
Another digression. To copy a file from your laptop/desktop to your Pi using Secure Shell, do this:
The above command assumes you're still using the default Raspberry Pi user name.$ scp (filename).py pi@raspberrypi.local:rpic/Download the GPIO CGI module listed above in Figure 7 (link), name it "index.py" if it doesn't already have that name, make it executable ($ chmod +x (name).py), and put it in the same directory as above.
Log onto the Pi, move to the "rpic" directory, and create a directory listing (issue command "ls -la"). The listing should look more or less like this:
username@raspberrypi:~/rpic $ ls -la
total 20
drwxr-xr-x  2 username username 4096 Mar 18 03:20 .
drwxr-xr-x 22 username username 4096 Mar 18 02:33 ..
-rwxr-xr-x  1 username username  497 Mar 18 00:48 cgi-http-server.py
-rwxr-xr-x  1 username username 6624 Mar 18 02:30 index.py
Notice about the above directory listing that:
- Both files are marked executable, as they must be to run.
- The directory in which they're located is also marked executable (which makes the directory accessible).
Now start the server. Enter this:
$ ./cgi-http-server.py &The "&" at the right puts the server process in the background, so the shell session remains accessible to you.
If there are no errors, the system will respond by printing the process id for the newly launched server process.
Now at your desktop machine, open a browser and provide it with this URL (enter a different network name if you've changed the hostname of your Pi):
$ my-favorite-browser http://raspberrypi.local:8080/index.pyIf all the above steps have been carried out correctly, you should see a display more or less like this:
Figure 8: Example remote control page
(Resizable: grab the lower right corner tab)Remember about the remote control page that it's been optimized for small-screen mobile devices, consequently it looks somewhat ridiculous on a large desktop display. If you have a mobile device with a browser, that might be a better choice for testing.
If all has gone to plan and the entry of the above URL to your favorite browser has allowed the remote control to appear, try pressing one of the buttons in the topmost row. If you have also set up the breadboard circuit described above, this test activation should cause one of the LEDs to light, and the remote control button will change color to show activation.
Now press the "All On" button. This should cause all the LEDs to activate, and all the remote buttons will change color.
- It's important to to understand that the labels shown in Figure 8 are only place-holders, and the user should enter his own labels (any names in any quantity up to 25) into the "index.py" file under the definition of "self.button_list".
Any number of mobile and other devices can display the remote control Web page, and all the displayed pages will remain synchronized — all will automatically update to show which devices have been activated.
Now we're ready to add relays and control electrical devices.
If your primary interest is in Insteon-technology house automation controls and if you have no interest in direct relay control using the Raspberry Pi, you can skip forward to the section entitled Insteon Controls.
Now we add relay drivers to the schematic shown in Figure 4:

Figure 9: Relay driver schematic (click image for fullsize PDF)
In Figure 9 I've added two example relay driver circuits to the LED display circuitry shown in Figure 4. The indicating LEDs remain for testing and coordination purposes, and there can be as many as 25 relay drivers for a Raspberry Pi 2 or 3. I've decided not to specify the component values more than is already true because the values aren't critical and the circuit will function with a wide variety of components depending on the relay size and requirements. The driver transistors are general-purpose switching transistors whose current-handling capacity need only exceed the load produced by the user's choice of relay.
Figure 9 shows the relays being powered by the Raspberry Pi five volt bus, which works all right when typical small reed relays are in use, but as the number and size of the relays increases it might be better to power them separately to avoid overwhelming the Pi's power supply.
When building this circuit, don't skip the spike suppression diode shown alongside each relay. This component absorbs a voltage spike resulting from the breakdown of the relay's magnetic field, a spike that can be several hundred volts in the worst case, and that has a good chance to destroy the driver transistor. Here are scope displays from an earlier relay driver project comparing outcomes with and without the suppression diode:
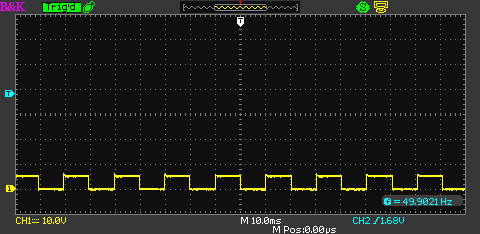
Figure 10: Voltage across relay coil with suppression diode D1
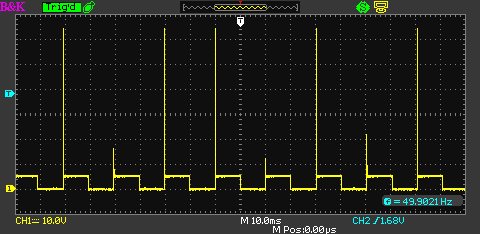
Figure 11: Voltage across relay coil with no suppression
(About 65 volts generated by a 5 volt circuit.)In this phase of the project, the user can install as many relay drivers and relays as required, up to 25 in current Raspberry Pi models, and connect high-current loads of various kinds. This project shows how a small computer like the Raspberry Pi can serve as a generic building block in a project designed to offer automation and control features at a reasonable cost.
In addition to the Raspberry Pi relay driver capability shows in the prior section, this project supports Insteon house automation controls by way of an Insteon controller like the Universal Devices ISY-994i (with which this program was tested) and an Insteon extension module. Here's a listing for the module that makes this mode possible:
Figure 12: Python listing of the Insteon extension module
(Click here for a downloadable plain-text source.)To enable this extension mode, take these steps:
- Download a copy of the Insteon extension module listed above (link), make it executable (chmod +x insteon_controller_extension.py) and place it in the directory containing the Web server components described earlier.
Edit the controller extension for your local requirements. At the locations indicated in the file, enter:
- A network name or address for your Insteon controller.
- A username and password, encoded in base64, unless you're using the default username/password of admin:admin. On a Linux system this is accomplished with:
$ echo "username:password" | base64In the server directory, create a subdirectory required by the Insteon controller module:
$ mkdir http_cacheNOTE: If you're planning to use an existing server instead of running the single-purpose server
cgi-http-server.pyas in the earlier examples, and with due attention to security issues, you will want to assign group and user ownership of this special directory to the server's "user", usually www-data. In such a case, as root:# chown www-data.www-data http_cacheThis method works because the "user" that runs a system-wide Web server is normally named "www-data".
At this stage, you may want to visit the server directory on the Raspberry Pi and make a directory listing (ls -la). The result should look more or less like this:
username@pl-pi:~/rpic $ ls -la total 32 drwxr-xr-x 3 username username 4096 Mar 19 05:30 . drwxr-xr-x 22 username username 4096 Mar 18 06:06 .. -rwxr-xr-x 1 username username 497 Mar 18 00:48 cgi-http-server.py drwxr-xr-x 2 username username 4096 Mar 19 05:30 http_cache -rwxr-xr-x 1 username username 6624 Mar 18 02:30 index.py -rwxr-xr-x 1 username username 6018 Mar 19 04:23 insteon_controller_extension.py- Unless you're planning to host the Web page under a pre-existing Web server, run the CGI server as shown in the earlier examples:
$ ./cgi-http-server.py &- Open your favorite browser with the URL of the controller's server:
$ my-favorite-browser http://localhost:8080/index.pyIf all settings have been made correctly and assuming your Insteon controller is enabled and accessible on your local network, instead of the default button labels of "Lamp[A-P]" present in the earlier relay driver scenario, you should see something like this, depending on how many Insteon devices you have installed in your house:
Figure 13: Example remote control page with Insteon extension
(Resizable: grab the lower right corner tab)- Notice about this remote control display that it's resizable (grab the resizing tab at the lower right) and when resized, the buttons and text automatically reformat themselves to occupy the available space. The remote control display looks and works better on a mobile device (the intended place for this display), where it will optimally reformat itself if you rotate your device between landscape and portrait orientations.
The Insteon remote display defaults to show defined scenes as shown in Figure 13 (and the Scenes/Devices buttons offer an easy way to change what's displayed). If the user prefers the default display to show devices instead, he can edit the Insteon_controller_extension.py file — change the first appearance of "self.mode = 'Scenes'" to "self.mode = 'Devices'".
In the Insteon mode described in this section, the Raspberry Pi GPIO controls described earlier continue to work, so it's possible to mix relay activation with Insteon controls.
There's another option for those only interested in Insteon controls, not Raspberry Pi GPIO controls — run the server on a laptop or desktop instead of a Pi. This undermines the desirable feature that the Pi can serve as a modular computer resource able to be put aside on a shelf and reliably offer a single function, but a laptop or desktop will run the server much more quickly. As the number of controlled devices increases, if remote responsiveness turns out to be a problem, this change usually solves the issue.
Web page rendering
However this project may appear to the reader, the most difficult part was making the remote display Web page usable on a mobile device. When it's meant to be used as a button-pad and displayed on a tiny cell-phone screen, a Web page suffers from a number of problems. One is that one cannot know in advance what size or orientation the display will have — landscape or portrait, to name two.
In response to the problems created by mobile devices, some page rendering methods have recently been created that minimize the chance of difficulty. Ironically, given the existence and purpose of CSS, the single most effective element I located was this META tag:
<meta name="viewport" content="width=device-width, initial-scale=1.0,maximum-scale=1.0,user-scalable=no"/>This tag forces the page to occupy the entire screen regardless of orientation, never larger nor smaller than the available screen dimensions, and it's something that CSS can't do on its own.
Within CSS, a number of new elements increase the likelihood of getting an acceptable display. One example are the variables vw, vh, vmin, and vmax:
- vw: 1/100th of current viewport width
- vh: 1/100th of current viewport height
- vmin: 1/100th of smallest dimension (height or width)
- vmax: 1/100th of largest dimension (height or width)
Among other things I used vmin to set the font size for the display (
font-size:4vmin), a size that needed to change dynamically with the display size so the labels stayed readable. The entire CSS page definition, showing frequent use of these new values, is located in the index.py file (link).Page update method
Web pages aren't normally updated without intervention by the user, but in order to keep all views up to date, the remote control Web page is periodically refreshed by means of another META tag:
<meta http-equiv="refresh" content="(time delay seconds)"/>It would be more efficient if there was a formal server-push scheme, but this is contrary to the prevailing philosophy of Web page delivery. As things stand, each displayed page is refreshed every two seconds to keep it synchronized with the state of the GPIO outputs and the Insteon devices if present. Fortunately, the Web page isn't very large or complicated, so the refresh scheme doesn't burden the Raspberry Pi very much.
Internet access
In principle one could serve this remote control Web page on the wider Internet, but the risks should be obvious. If this idea is considered, it might be a good idea to serve the page using SSL, and with a password login requirement.
Thanks for visiting and reading.
Raspberry Pi Remote is Copyright 2016, P. Lutus and is released under the GPL.
Versions (reverse chronological order):
- 03.19.2016 Version 1.1. Changed logic so that, if there are no scenes defined in the Insteon database, the Scenes/Devices selector buttons won't be displayed.
- 03.18.2016 Version 1.0. Initial Public Release.
| Home | | Raspberry Pi | | | | Share This Page |
